How to Download Google, Apple Maps on Your Phone for Travel

Even in this day and age, you can’t always guarantee a strong cellular connection to a mobile network everywhere you go, especially if you’re on vacation. That can cause a problem when you’re trying to make your way from A to B using your map app of choice. The solution is to download and cache sections of the map you’re going to need ahead of time.
With the arrival of iOS 17—currently in public beta—Apple Maps has finally caught up to Google Maps in this regard, enabling you to specify a certain region to store locally on your phone. Should you lose signal, you’ll still be able to find your way and get turn-by-turn directions to your next destination.
Google Maps
Open up Google Maps on your phone, and search for the area you want to save. Once you’ve got it displayed, tap the back button (Android) or cross button (iOS) at the top to clear the search but leave the area on screen. Next, tap your Google account profile picture (top right) and pick Offline maps.
You may find that some areas, such as your home location, have been downloaded in advance. Tap Select your own map to create a new download, and Google Maps draws an area around the location you just searched for—you can pinch and zoom, and drag around the map, to change which part of the map gets saved.
Down at the bottom of the screen, you’ll see an estimate of how much internal storage space the cached map will take up, and obviously saving more of the map means it takes up more room on your phone. When you’re happy with the area that you’ve selected, tap on Download to save it.
On the list of downloaded maps, you can tap the three dots to the right of any entry in the list to rename it, update it with the latest map information, or delete it. Offline maps expire and can’t be used after 30 days without an update, but the app itself will attempt to automatically update them in the background if they’re due to expire within 15 days and your phone is connected to wifi.
To change this behavior, tap the cog icon in the top right corner of the offline maps list. You can turn off auto-updates, choose whether they can be downloaded over cellular networks as well as wifi, and get prompts for recommended map downloads—usually pulled from searches and Gmail messages around trips you’re about to take.
Apple Maps

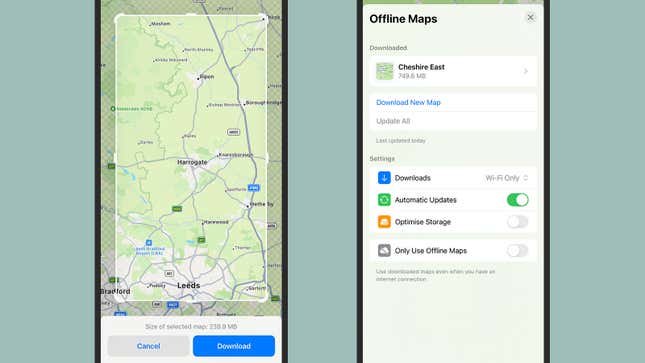
In Apple Maps on iOS 17 or later, you can also download maps for offline use (these maps will work offline on your Apple Watch too, though you can’t initiate downloads from the watch). In the app, navigate to a part of the world that you’d like to save to your phone, tap your Apple account profile picture on the right, then choose Offline Maps.
Tap Download New Map, and pick an area of the map you want to save—either your current location, a recent search, or a new search. You’ll then be presented with a screen showing the section of the map that’ll be downloaded, and you can zoom and drag around to change the size and location of the area (the amount of room the download will take up on your phone is continually updated at the bottom).
When you’re happy with the region that’s selected on screen, tap Download, and the necessary caching begins. Once the map appears in the list on the Offline Maps screen, you’re able to tap on it to adjust the area it covers, rename it from the default name assigned to it, and delete it from your phone.
As we’re writing this, Apple has yet to produce any official supporting documents for the feature, so we’re making several assumptions here—but it does appear that offline maps will be updated on a regular basis whenever your phone has connectivity so that the cached maps are as accurate as possible.
These automatic updates can be turned off in the settings on the Offline Maps screen, and you can choose to have maps downloaded over cellular networks as well as wifi. The other toggle switches let you force Apple Maps to use the downloaded maps even when an internet connection is available, and to optimize maps storage—though until the feature launches in full, we’re not exactly sure how this works.
Source link


